This is a fairly uncommon way to create death triggers but basically it's possible to stack death triggers on top of each other to execute some other command. I've made an example of this which can be found here: http://zetaflow.skylogic.ca/game/profile/14620
TL;DR:
The yellow text explains the following code.
Uses for this:
1: Assume you have 2 parts and the core. The core has been made invincible, and the intended way to make it vulnerable would be to destroy the two parts in the level. Without multi-part death triggers, this would have to be solved by placing a part to cover the core to act as the first shield, which would be destroyed by the first death trigger, and then the second part to make the core vulnerable. This would ruin the look of your level.
2: Take the previous example and instead of wanting to make the core vulnerable, assume you wanted to enable a gun, or change the color of a part. In order to do this you would have to use multi-part triggers to get the desired result. There is no other way to do this with the condition that only the two intended parts get destroyed.
Explanation and how to use multi-part death triggers:
Death triggers work in that when you destroy the part that the death trigger is attached to, you can execute a new command. A few examples of this would be:
Death trigger usage
Code: Select all
makeTrigger, death, SOURCE_PART#, ANY_COMMAND
makeTrigger, death, 1, destroy, 0
makeTrigger, death, 1, col, FFFFFF, 0
makeTrigger, death, 1, makeTrigger, time, 100, makeVulnerable, 0 Incorrect usage
Code: Select all
makeTrigger, death, 1, 2, destroy, 0Two part death trigger
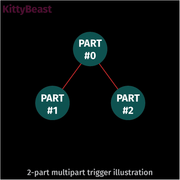
Code: Select all
makeTrigger, death, 1, makeTrigger, death, 2, destroy, 0
makeTrigger, death, 2, makeTrigger, death, 1, destroy, 0That's why you need to add a second command with part 2 first followed by part 1. No matter what, both commands will never trigger, only one of them.
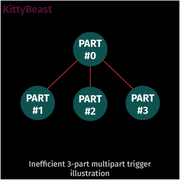
This is the most efficient way of creating multi-part death triggers. If you want to use more parts in the multi-part death trigger, then there are ways to be more efficient. Let me show you an example of code for a 3-part multi-part death trigger:
Inefficient three part death trigger
Code: Select all
makeTrigger, death, 1, makeTrigger, death, 2, makeTrigger, death, 3, destroy, 0
makeTrigger, death, 1, makeTrigger, death, 3, makeTrigger, death, 2, destroy, 0
makeTrigger, death, 2, makeTrigger, death, 1, makeTrigger, death, 3, destroy, 0
makeTrigger, death, 2, makeTrigger, death, 3, makeTrigger, death, 1, destroy, 0
makeTrigger, death, 3, makeTrigger, death, 1, makeTrigger, death, 2, destroy, 0
makeTrigger, death, 3, makeTrigger, death, 2, makeTrigger, death, 1, destroy, 0
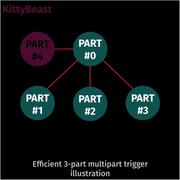
Assume you want to make a 3 part death trigger. Place the three parts and one more part which will be invicible (using setWidth and setHeight), invincible and preferably connected to the core. This fourth part will be an aid for the multi-part death trigger, and will shorten the code, especially as you get more parts for a death trigger.
Using the following code you will get a 3 part death trigger (using the set-up listed in the above paragraph:
Efficient three part death trigger using four parts
Code: Select all
makeTrigger, death, 1, makeTrigger, death, 2, destroy, 4
makeTrigger, death, 2, makeTrigger, death, 1, destroy, 4
makeTrigger, death, 3, makeTrigger, death, 4, makeVulnerable, 0
makeTrigger, death, 4, makeTrigger, death, 3, makeVulnerable, 0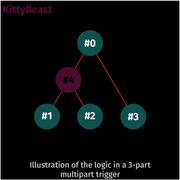
This will act as two times two part death triggers connected to each other to act as a 3 part death trigger. The code is 2 lines shorter than a 3 part death trigger and uses 1 more part, but serves the same function.
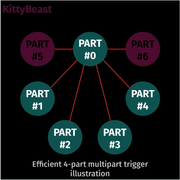
The same can be used for a four part death trigger, and instead of using 24 lines of code, you can rather use 6 lines of code and 6 parts. Assume part 1,2,3 and 4 are visible and part 5 and 6 are invisible and invincible. Here's how that would look:
Efficient four part death trigger using six parts
Code: Select all
makeTrigger, death, 1, makeTrigger, death, 2, destroy, 5
makeTrigger, death, 2, makeTrigger, death, 1, destroy, 5
makeTrigger, death, 3, makeTrigger, death, 4, destroy, 6
makeTrigger, death, 4, makeTrigger, death, 3, destroy, 6
makeTrigger, death, 5, makeTrigger, death, 6, makeVulnerable, 0
makeTrigger, death, 6, makeTrigger, death, 5, makeVulnerable, 0
And that's most of it. Have a look at these levels which make use of some variant of this and the various ways you can use multi-part death triggers:
asdasdg's order doesn't matter http://zetaflow.skylogic.ca/game/profile/13120
Piconoe's [Xenon Saga] Armored Space Destroyer http://zetaflow.skylogic.ca/game/profile/14430
KittyBeast's Challenge mode: Level 8 http://zetaflow.skylogic.ca/game/profile/14691
KittyBeast's Guardian http://zetaflow.skylogic.ca/game/profile/14626
I hope this has inspired some of to try using some multi-part death triggers! Perhaps my in depth explanations can spark some new never-before-seen concepts. I guess I'll have to see
UPDATE: Added illustrations to clear up confusion. Green circles are visible and interactive parts, red circles are invisible and invincible. The logic illustrations shows what parts interact with each other.
Thanks for reading
Kind regards,
KittyBeast